Author: Staff

  • Get the Tea on the Hottest Spring 2025 Nail Trends Top Celebs and Influencers Are Wearing! We Cosign and Love These Trends Too!

    Get the Tea on the Hottest Spring 2025 Nail Trends Top Celebs and Influencers Are Wearing! We Cosign and Love These Trends Too!

    🔥 Trending now – share this post

    If you’re looking to refresh your nail game this spring, you’ve landed in the right place. Whether you’re a salon regular, a DIY nail artist, or just browsing for inspiration, this post is your go-to guide for all things trending in the world of nails this season. From timeless classics to bold new innovations, we’re covering everything from acrylics to silk wraps, and the hottest nail looks dominating Pinterest and Amazon right now.

    Spring 2025 Nail Trends: What Changed from Last Year

    Last spring, we saw a harmonious blend of minimalism and maximalist nostalgia. Trends like “soap nails” (ultra-glossy, translucent designs) and “licorice French tips” (black twist on a classic) rose in popularity. The fresh use of lilac tones, real dried petals, and medium-length, squoval nail shapes gave wearers options to mix elegance with playfulness.

    Why it worked:

    • Balanced aesthetic appeal and practicality.
    • Perfectly in sync with cottagecore, soft glam, and Gen Z creativity.
    • Highly shareable designs that dominated TikTok and Pinterest boards.

    Why they’re evolving:

    • Beauty lovers now crave more individuality and expressive looks.
    • New textures, bolder colors, and hybrid styles are leading the charge.
    • Accessibility of pro-level DIY tools has empowered more people to create salon-quality nails at home.

    Top Trending Nail Types (Spring 2025)

    This season, nail lovers are leaning into different mediums depending on their personal style, lifestyle, and skill level. Here’s a breakdown of what’s trending by nail type and what makes each one unique.

    Acrylic Nails

    • What They Are: Durable nails sculpted using liquid monomer and powder polymer, ideal for long-lasting designs.
    • Best For: Long wear, dramatic lengths, and bold art.
    • Lifestyles: Best for low-contact lifestyles or glam lovers who want nails to last 3–4 weeks.
    • DIY vs Salon: DIY kits ($25–$40) vs $60–$100 per set = Save $720+ annually.

    Top Trends for Acrylics

    • Encapsulated Floral Art: Dried petals within clear acrylic. Works well with soft spring dresses, outdoor weddings, and brunch gatherings. It’s trending because it captures nature’s beauty in a wearable way.
    • 3D Chrome Appliqués: Sculpted metallic accents that catch light and attention. These pair great with edgy outfits or party wear. Their rise stems from the Y2K revival and love for all things shiny and futuristic.

    Gel Nails

    • What They Are: Polish cured under UV/LED light that lasts 2–3 weeks without chipping.
    • Best For: Glossy finishes, quick-dry needs, and minimal damage.
    • Lifestyles: Great for busy professionals and travel lovers.
    • DIY vs Salon: $40 gel kits vs $50–$70 per salon visit = Save ~$700/year.

    Top Trends for Gel

    • Milky Gradient Ombré: Subtle transitions in nude or soft pinks that go with both casual and formal outfits. Trending because it’s classy and Instagram-worthy.
    • Negative Space Hearts: Tiny heart shapes cut out in negative space. Perfect for dates and day trips. People love this for its minimalist romantic vibe.

    Press-On Nails

    • What They Are: Pre-designed nails that adhere with glue or adhesive tabs.
    • Best For: Temporary glam and quick swaps.
    • Lifestyles: Ideal for events, travel, or anyone who changes styles often.
    • DIY vs Salon: $8–$20 per set vs $60+ at salons = Save ~$500/year.

    Top Trends for Press-Ons

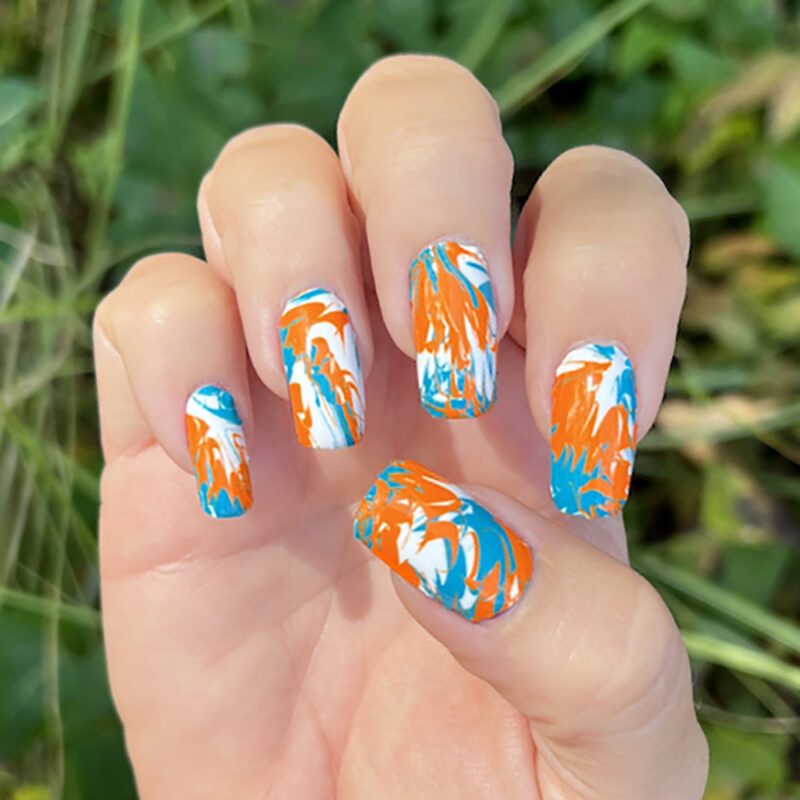
    • Marble Pastels: Swirled shades that go with denim, floral dresses, or even formalwear. Popular due to the dreamy, artsy vibe.
    • Glossy Animal Prints: Zebra or cow prints made glossy. Bold, fun, and popular with influencers.

    Dip Powder Nails

    • What They Are: Colored powder layered and sealed with adhesive for long wear.
    • Best For: Strength, chip-resistance, and smooth finish.
    • Lifestyles: Great for anyone hard on their hands—nurses, stylists, etc.
    • DIY vs Salon: $40 dip kit (lasts months) vs $50–$70 per visit = Save ~$600–$800/year.

    Top Trends for Dip Powder

    • Peach Sorbet Nails: Sunny and soft. Looks perfect with white, beige, or coral outfits.
    • Tiny Polka Dots: Chic with a touch of whimsy. Trendy due to its simplicity and versatility.

    Silk Wrap Nails

    • What They Are: Layers of silk wrapped over the natural nail to strengthen and smooth.
    • Best For: Repairing weak or cracked nails.
    • Lifestyles: Great for low-maintenance wearers or people growing out nails.
    • DIY vs Salon: Silk wrap kits ($15–$30) vs $50–$60 per salon visit = Save ~$500/year.

    Top Trends for Silk Wraps

    • Soft Shimmer Overlays: A whisper of sparkle. Looks great in business casual settings or wedding parties.
    • Micro Floral Prints: Tiny blooms, subtle and sweet. Popular for their dainty, fashion-forward appeal.

    Top 6 Nail Art Design Trends (Spring 2025)

    1. Petal Press Nails

    • What it is: Encapsulated flower petals inside acrylic or gel nails for a nature-inspired, delicate look. Imagine clear nails adorned with pastel-colored petals, like dried forget-me-nots or roses, suspended in the design. It’s the perfect blend of natural beauty and modern style.
    • Why it’s trending: These nails evoke springtime romance and elegance, making them perfect for weddings, spring outings, or garden parties.
    • DIY vs Salon:
      • DIY: $15 for a floral encapsulation kit.
      • Salon: $60+ for a custom petal encapsulation.
      • Savings: Save $540+ annually by doing this yourself.

    2. Lilac Love

    • What it is: Soft pastel purple shades that blend seamlessly across different nail types—whether on acrylics, gels, or press-ons. Think of an elegant, light purple hue that feels both soothing and fresh, embodying the essence of spring.
    • Why it’s trending: Lilac represents calmness and creativity. It’s a universally flattering shade that works well for both professional and playful looks. It pairs beautifully with floral prints and light spring wardrobes.
    • DIY vs Salon:
      • DIY: $10 for lilac gel polish.
      • Salon: $45+ per session for professional lilac nails.
      • Savings: Save about $420+ annually.

    3. Soap Nails

    • What it is: Ultra-glossy, translucent nails with a high-shine finish that looks almost like soap bubbles or wet glass. The light reflects off the surface to give a smooth, clean look, often with hints of subtle color or design beneath the gloss.
    • Why it’s trending: The clean, minimal look of soap nails fits perfectly with the ongoing trend for fresh, dewy, and glossy aesthetics. It’s the perfect style for those who love sleek, polished looks without the fuss.
    • DIY vs Salon:
      • DIY: $10 for a high-gloss topcoat.
      • Salon: $50+ for soap nails done professionally.
      • Savings: Save $480+ annually by opting for DIY.

    4. Squoval Nail Shapes

    • What it is: A hybrid shape between square and oval nails. The edges are rounded but maintain the angular, clean look of a square. It’s ideal for anyone who loves the strong look of square nails but prefers a bit of softness.
    • Why it’s trending: Squoval nails are versatile and wearable, making them perfect for both professional settings and casual spring vibes. They’re flattering on most hands and are easy to maintain.
    • DIY vs Salon:
      • DIY: Nail file kit costs about $10.
      • Salon: Shaping costs about $20 per session.
      • Savings: Save $200 annually by shaping at home.

    5. Pastel French Tips

    • What it is: A modern twist on the classic French manicure, but with pastel colors like mint green, soft pink, or lavender instead of the traditional white tips. It’s clean, sophisticated, and vibrant all at once.
    • Why it’s trending: Pastel French tips are fresh and playful, perfect for spring. They can be worn in both casual and formal settings, making them a versatile option for any occasion.
    • DIY vs Salon:
      • DIY: $12 for tip guides and pastel polish.
      • Salon: $50 for a French manicure with pastel tips.
      • Savings: Save $450 annually with DIY.

    6. Milky Ombré Shades

    • What it is: A gradient effect that moves from a creamy white or nude base to a slightly deeper color at the tips. The effect is soft, elegant, and understated. It’s like a cloud of color, giving the nails a fresh and airy feel.
    • Why it’s trending: Milky ombré nails are perfect for any occasion, offering a modern twist on classic ombré. They give a serene, sophisticated vibe that suits every outfit from brunch to formal events.
    • DIY vs Salon:
      • DIY: $15 for gel polish and ombré brushes.
      • Salon: $60+ per session for a professionally done ombré effect.
      • Savings: Save about $500 annually.

    Top 6 Nail Art Designs Trending on Pinterest (Spring 2025)

    Pinterest is the ultimate hub for discovering new trends, and these nail art designs are all over the platform right now. They’re visually stunning and have caught the attention of nail artists and fashionistas alike.

    1. Butterfly Accents

    • What it is: Delicate butterfly illustrations or 3D embellishments added to nails. Picture soft pastel butterflies fluttering across your nails, or even intricate, detailed designs in bold shades of yellow, pink, or blue. These designs can be minimalist or elaborate.
    • Why it’s trending: Butterflies symbolize change and beauty, making them the perfect design for spring. They’re elegant and whimsical, ideal for those who want a soft but trendy look.
    • DIY vs Salon:
      • DIY: $5 for butterfly decals.
      • Salon: $55+ for hand-painted butterfly designs.
      • Savings: Save ~$600/year by using decals.

    2. Jelly Nails

    • What it is: Transparent nails tinted with vibrant, jelly-like colors. Think of neon greens, reds, or blues that give a bold, glossy finish. Jelly nails are fun, bright, and have a cool, vintage vibe.
    • Why it’s trending: These nails bring back a ’90s vibe and pair perfectly with spring’s love of color. They’re especially great for festivals or any casual outing that calls for a pop of color.
    • DIY vs Salon:
      • DIY: $12 for jelly polish.
      • Salon: $50+ for professional jelly nails.
      • Savings: Save about $450/year with DIY.

    3. Mini Fruit Prints

    • What it is: Nail art featuring tiny illustrations of fruits like strawberries, cherries, and lemons. They’re playful and fun, often done in bright, cheerful colors. Imagine a nail with a single, small strawberry design or a row of little lemons near the tips.
    • Why it’s trending: Fruit designs are fun, colorful, and scream spring. They’re perfect for festivals, beach days, or anyone looking for a cheerful nail look to match the season.
    • DIY vs Salon:
      • DIY: $8 for a stamping kit with fruit patterns.
      • Salon: $55+ for hand-painted fruit art.
      • Savings: Save $500+/year with DIY.

    4. Watercolor Blooms

    • What it is: Soft, blended florals painted in watercolor styles on nails. These designs often feature florals in soft, muted colors, giving them a dreamy, artistic appearance. It’s like having a mini painting on each nail.
    • Why it’s trending: Watercolor florals are romantic and artistic, making them perfect for special occasions like weddings or tea parties. They’re also very Instagram-friendly.
    • DIY vs Salon:
      • DIY: $10 for a watercolor brush and pastel paints.
      • Salon: $60+ for watercolor-style floral nails.
      • Savings: Save $500+/year by DIYing.

    5. Chrome Tips

    • What it is: A futuristic take on the French manicure, where the tips are coated in shiny, metallic chrome. The reflective surface gives a bold, edgy vibe. The rest of the nail can be kept neutral or enhanced with chrome accents.
    • Why it’s trending: Chrome nails have a sleek, high-fashion vibe that’s both modern and eye-catching. They’re popular with those looking to make a statement with their nails.
    • DIY vs Salon:
      • DIY: $15 for chrome powder kit.
      • Salon: $65+ for chrome nail applications.
      • Savings: Save $600+/year with DIY.

    6. Aura Nails

    • What it is: A soft gradient of color that mimics an aura around the nail, typically in pastel or iridescent hues. These nails have a glowing, ethereal vibe that transitions smoothly from one color to another.
    • Why it’s trending: Aura nails evoke feelings of calm and spiritual balance. Their soft, glowing effect is popular for those looking for a delicate yet trendy design.
    • DIY vs Salon:
      • DIY: $20 for an airbrush kit.
      • Salon: $70 for professionally done aura nails.
      • Savings: Save $600+/year with DIY.

    Top 6 Nail Products on Amazon (Spring 2025)

    Amazon is packed with incredible nail products that can help you achieve professional-quality nails at home. Here are six that are top-rated, high-quality, and cost-effective.

    1. Beetles Gel Nail Polish Kit

    • What it is: A gel nail polish kit with all the essentials—polish, UV light, base and top coat, plus tools. Everything you need for salon-quality nails at home.
    • Why it’s loved: Easy to use, long-lasting, and available in a variety of colors, this kit has earned rave reviews from users who love the high shine and smooth finish.
    • Price: $39.99 vs salon gel sets at $600+ annually.
    • Savings: Huge savings by DIYing your nails with this kit.

    2. Modelones Dip Powder Starter Kit

    • What it is: A complete dip powder kit with powders, a brush, and activator, all designed for a long-lasting, chip-free manicure.
    • Why it’s loved: Dip powder nails are known for their strength and durability. This kit makes it easy to create salon-quality nails without the hassle.
    • Price: $32.99 vs $720/year at the salon.
    • Savings: Save a lot by switching to dip powder at home.

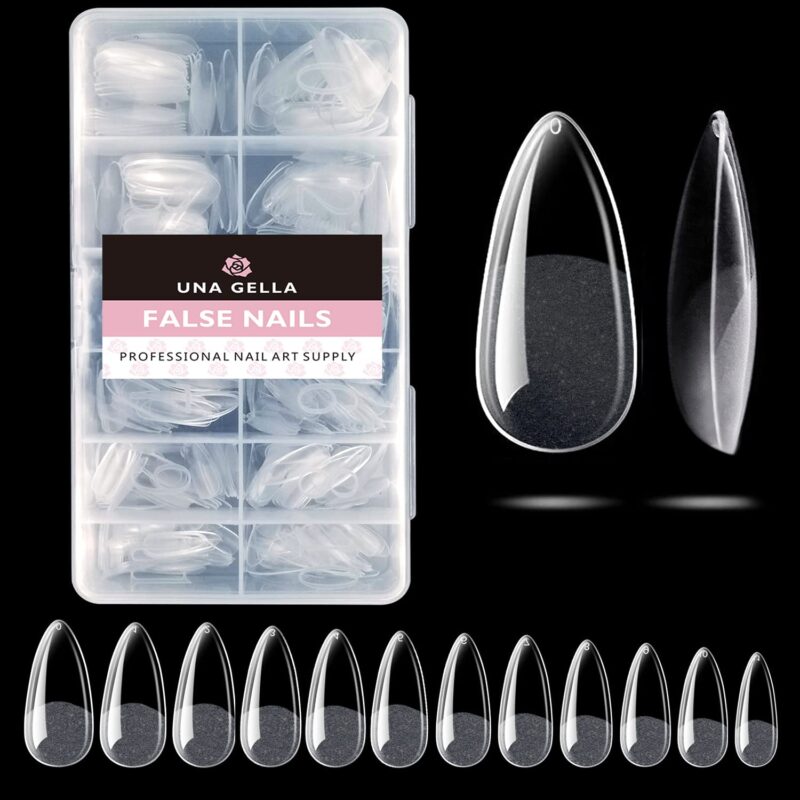
    3. Kiss Gel Fantasy Press-On Nails

    • What it is: Pre-designed press-on nails in a variety of styles and colors. These nails come with glue or adhesive tabs for easy application.
    • Why it’s loved: They’re quick, easy, and come in chic designs perfect for last-minute events.
    • Price: $8.99/set vs $60+ at salons.
    • Savings: Save $500/year with press-ons.

    4. Saviland Chrome Powder Kit

    • What it is: A kit that includes chrome powder for creating shiny, metallic nails. This allows you to add a futuristic touch to any look.
    • Why it’s loved: The versatility and shine of chrome powder make it a favorite for those who want to stand out with their nails.
    • Price: $13.99 vs $65 salon.
    • Savings: Save $500/year with DIY chrome nails.

    5. Makartt Nail Art Brushes Set

    • What it is: A set of high-quality brushes designed for intricate nail art, including detailed designs like floral prints and geometric patterns.
    • Why it’s loved: Essential for any DIY nail artist, this brush set allows for precision and creativity in every design.
    • Price: $14.99 vs $20–$30 per design add-on at the salon.
    • Savings: Save $200+ annually by doing your own nail art.

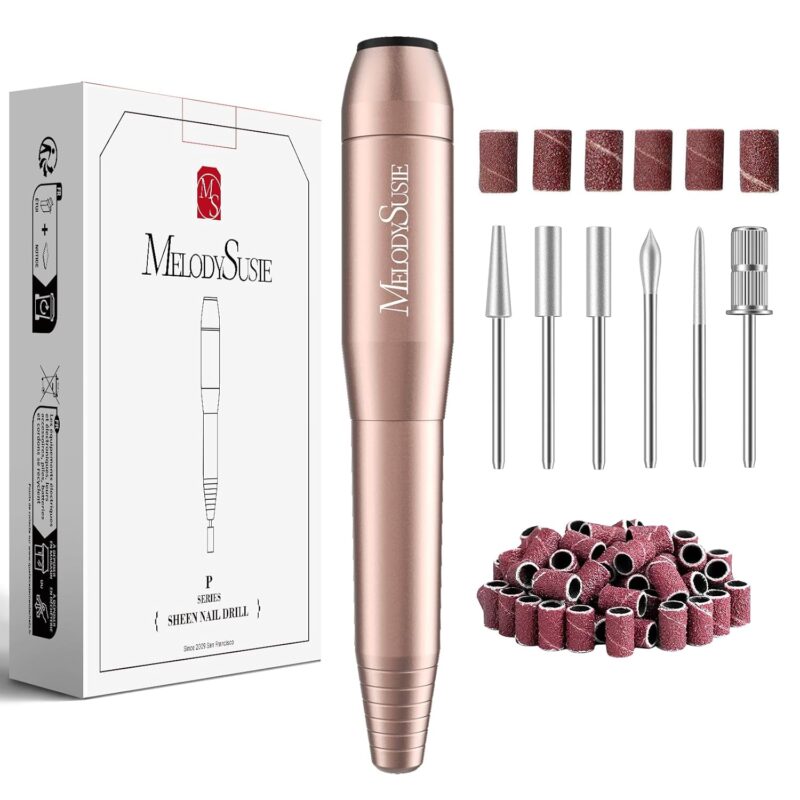
    6. Morovan Acrylic Nail Kit with Drill

    • What it is: A full acrylic nail kit that includes everything you need to apply acrylic nails, from a nail drill to acrylic powders and tools.
    • Why it’s loved: This kit is loved by DIY enthusiasts for its comprehensive set and ease of use.
    • Price: $49.99 vs $100 per salon visit.
    • Savings: Save $1,000+/year by doing acrylic nails at home.

    Final Conclusion: Spring Nails Are a Must!

    Spring 2025 nails are all about fresh, vibrant, and expressive designs that reflect individuality and creativity. Whether you opt for long-lasting acrylics, playful press-ons, or sleek gels, there’s something for everyone this season. Plus, with the amazing DIY products available, you can save big while still rocking the latest trends.

    Are you ready to try a new style? Whether you’re heading to the salon or embracing DIY, let this season’s nail trends inspire your next manicure. 🌸💅

  • Nail Creators are Crushing It Right Now and It’s Never Been Easier to Start: See How and Get the Tea

    Nail Creators are Crushing It Right Now and It’s Never Been Easier to Start: See How and Get the Tea

    🔥 Trending now – share this post

    The world of nail art has exploded in recent years — not just as a beauty service, but as a full-fledged digital business. From creating mesmerizing content on social media to selling digital products and press-on nail kits, becoming a nail artist creator means turning your passion into profit while connecting with a global audience. This guide will show you exactly how to do that — step by step.

    Why Become a Nail Artist Creator?

    More than ever, people are looking for creative ways to express themselves and earn a living. Nail artistry sits at the intersection of beauty, design, and content creation. Here’s why becoming a nail artist creator is such an appealing path:

    🎨 Creative Expression

    If you’re someone who enjoys drawing, painting, or fashion, nail art offers a satisfying way to express that creativity in a small, but powerful canvas. You’ll constantly be inspired by trends, colors, and client requests — and your creativity becomes your trademark.

    🕒 Flexible Schedule

    Being a creator gives you the freedom to design your days. Whether you’re working a 9–5 and doing nails as a side hustle, or going full-time as a freelancer or content creator, you can choose your hours, clients, and workload.

    🌍 Global Reach

    Social media allows you to connect with people from all over the world. A viral TikTok or Instagram Reel can get your work in front of millions — potentially attracting new clients, collaborations, and sponsorships.

    💸 Multiple Income Streams

    This career doesn’t box you into one income stream. You can do nails in-person, sell products online, teach courses, create digital content, and more. That kind of flexibility helps you build a stable and scalable business.

    💼 Low Startup Costs

    Unlike some businesses that require major investments, you can start creating content or offering services with a basic nail kit, a tripod, and your phone. As your income grows, you can reinvest into better equipment or branding.

    How Profitable Can It Be?

    Nail artistry is no longer just a local service — it’s a brandable and monetizable online presence. Depending on your level of skill, audience size, and consistency, your monthly income could vary widely:

    Entry-Level Creators ($500–$2,000/month)

    • Just starting out, offering client services or basic tutorials.
    • Rely mostly on local appointments and ad-hoc income from small brand deals or tips.
    • Growth typically comes from building a local client base or gaining traction on TikTok or Instagram.

    Established Creators ($5,000–$15,000/month)

    • May have 10K+ followers, recurring brand deals, and sell digital or physical products.
    • Likely monetizing multiple streams: affiliate links, workshops, content, and press-ons.
    • Consistency and niche branding are key at this level.

    Top-Tier Creators ($20,000+/month)

    • High follower count (100K+), solid brand identity, and multiple scalable income streams.
    • Own product lines, course sales, and even licensing deals.
    • Likely work with major beauty brands and get paid for appearances or collaborations.

    Revenue Models: How to Make Money as a Nail Artist Creator

    There are many ways to earn as a nail artist — you’re not limited to just doing nails in person. Here’s a deeper dive into each of the main revenue streams and how you can start building them:

    1. Client Services (In-Person or Virtual)

    Start here if you’re already doing nails or want to start with hands-on work.

    • Time to Profit: Almost immediate if you already have skills and tools.
    • How It Works: You offer manicures, nail extensions, or nail art designs in a salon, home studio, or as a mobile service. You can also offer one-on-one virtual consultations or tutorials.
    • How to Grow: Ask satisfied clients for testimonials, post before-and-after transformations, and offer referral discounts.

    Pro Tip: Create a branded booking page (via Square, Fresha, or Acuity) and link it in your Instagram bio. Make it easy for new clients to book.

    2. Content Creation (YouTube, TikTok, Instagram)

    If you love filming and editing, this is a game-changer.

    • Time to Profit: 1–6 months depending on consistency and niche.
    • How It Works: You post tutorials, ASMR polish applications, design challenges, or timelapse videos. Once you build an audience, you earn from ads, brand deals, product placements, and even fan subscriptions (on platforms like Patreon).
    • What You’ll Need: Good lighting, a phone stand/tripod, basic editing tools (CapCut, InShot, Adobe Premiere Rush).

    Pro Tip: Stick to a visual style (colors, music, editing flow) so people begin to recognize your brand.

    3. Affiliate Marketing

    A passive way to earn through content you’re already posting.

    • Time to Profit: 2–4 months as your content starts generating consistent clicks.
    • How It Works: You use unique links to recommend products (nail tools, polishes, press-ons, lighting kits). You earn a commission when followers buy through your link.
    • Where to Start: Amazon Associates, ShareASale, RewardStyle, or beauty brand affiliate programs.

    Pro Tip: Post “favorites” videos or create a nail supply kit and include affiliate links in captions or bios.

    4. Digital Products

    Turn your skills into sellable resources.

    • Time to Profit: 1–3 months (faster if you already have a small audience).
    • How It Works: You create templates, guides, or even art packs that others can purchase. Think of it like selling knowledge or time-saving tools.
    • Ideas: Nail art design ebooks, printable practice sheets, branding kits for nail techs, Canva templates.

    Pro Tip: Use platforms like Gumroad, Ko-fi, or Etsy to sell and deliver products automatically.

    5. Online Courses or Workshops

    This is where your knowledge becomes your high-ticket product.

    • Time to Profit: 2–6 months depending on course length and marketing.
    • How It Works: You pre-record lessons or offer live workshops teaching skills like acrylic application, beginner designs, or how to film content. Sell the course on platforms like Teachable, Thinkific, or Skillshare.
    • Best Strategy: Start with a free class to collect emails, then upsell your paid course.

    Pro Tip: Use testimonials and transformation stories to boost trust and increase signups.

    6. Merchandise or Product Line

    If you’ve built a following, launching a product can solidify your brand.

    • Time to Profit: 3–6 months (includes product development and branding).
    • How It Works: You sell physical goods like press-on nails, custom nail decals, or branded nail kits. You can start small on Etsy or build a full Shopify store.
    • Fulfillment Options: DIY packaging or work with print-on-demand and dropshipping suppliers.

    Pro Tip: Create behind-the-scenes content during your product creation journey to build hype.

    Top Social Media Platforms for Nail Artists

    Your content lives or dies by where and how you post it. Each platform has unique strengths — here’s where to focus:

    📸 Instagram

    • Best For: Portfolios, reels, and brand building.
    • How to Win: Use niche hashtags, create carousels of your designs, and post daily stories to stay top-of-mind. Tag relevant brands for reposts and exposure.

    🎥 TikTok

    • Best For: Fast growth and viral content.
    • How to Win: Focus on trending sounds, fast-paced tutorials, and ASMR nail content. Post 1–3x per day during growth phases.

    📺 YouTube

    • Best For: Long-form tutorials and high-paying ad revenue.
    • How to Win: Post weekly videos with clickable thumbnails and searchable titles (e.g., “How to Do Ombre Acrylic Nails at Home”).

    📌 Pinterest

    • Best For: Long-term traffic and search-based discovery.
    • How to Win: Pin daily with beautiful photos and link to your blog, Etsy store, or Instagram.

    How to Build a Sales Funnel as a Nail Creator

    A sales funnel is how you lead your followers from discovering you to buying from you. Here’s how to build one as a nail artist:

    1. Attract

    Create scroll-stopping content with value: tutorials, tips, or transformation videos. Post regularly to get discovered by new audiences.

    2. Engage

    Use polls, questions, and behind-the-scenes content to get your audience interacting. Respond to every DM and comment when you’re starting out.

    3. Convert

    Use link-in-bio tools to drive people to your products, booking page, or email list. Offer freebies (like a design guide) in exchange for an email address.

    4. Upsell

    After someone buys a $10 product, offer them a $50 course. After they book one session, offer a bundle or membership.

    5. Retain

    Stay connected through email newsletters, VIP groups, and exclusive content drops. Keep showing up in their feed.

    Pro Tip: Use tools like Flodesk, Mailchimp, or ConvertKit for email marketing.

    How to Scale Your Nail Art Brand Online

    Once you have a working system, you can scale it to grow your revenue without burning out.

    🔁 Batch Content

    Record 5–10 videos at a time. This lets you stay consistent even on busy weeks and frees up time for building your business.

    🤖 Automate

    Use scheduling tools (Planoly, Later, Buffer) to plan your content. Automate your email sequences and product delivery for passive income.

    👥 Build a Team

    As you grow, outsource editing, social media replies, or packaging to freelancers or assistants. Focus on high-impact work like branding and strategy.

    🤝 Collaborate

    Do guest Lives, cross-promotions, and giveaways with other creators or brands to reach new audiences.

    📈 Run Ads

    If you have a product or course that converts well, run Instagram or TikTok ads to scale sales and traffic.

    Final Thoughts: Is Becoming a Nail Artist Creator Worth It?

    Absolutely. Becoming a nail artist creator gives you the freedom to be creative, the opportunity to build real income, and the joy of helping others express themselves through beauty. Whether you’re working with clients, building a digital brand, or launching your own product line — this path is rich with potential.

    The key is to start with one income stream, post consistently, and build relationships with your audience. Over time, you’ll develop a personal brand and business that grows alongside your passion.

  • OMGosh! This Nail Tech Approved Hydrating Oil Saved My Nails From Years of Damage and Misuse So Fast: Top Ranked Review

    OMGosh! This Nail Tech Approved Hydrating Oil Saved My Nails From Years of Damage and Misuse So Fast: Top Ranked Review

    🔥 Trending now – share this post

    If you’ve ever wondered why your manis don’t quite give off that I-just-left-the-salon glow, let me spill the tea: it’s all in the cuticle oil. And not just any cuticle oil — the Cuccio Revitalize Cuticle Oil in Natural Scents is legit next-level when it comes to nail nourishment, shine, and long-term health.

    Whether you’re doing your own nails or maintaining a fresh set from the pros, this product is your new MVP for hydrated, happy cuticles and nails (and bonus: it smells divine).

    💡 What Is It?

    This isn’t your average runny, greasy oil. Cuccio’s Natural Scent Cuticle Oil is a salon-grade treatment that deeply hydrates dry, brittle cuticles and strengthens the surrounding skin and nail beds. It’s infused with natural oils, milk proteins, and honey extract amongst others, so it not only softens rough skin but helps restore and lock in moisture long-term.

    Cuccio Cuticle Nail Oil
    Cuccio Cuticle Nail Oil

    It’s lightweight, non-greasy, and comes in a glass dropper bottle so you can apply just enough without overdoing it. Plus, it smells like a warm spa day — hint, the sweet honey and creamy milk vibe is devine.

    ✨ Why It’s a Game-Changer

    Most people skip cuticle oil, not realizing it’s the secret sauce to long-lasting manis and healthy nails. Cuccio’s formula brings spa-level luxury to your at-home routine for a fraction of the price.

    Cuccio Cuticle Nail Oil
    Cuccio Cuticle Nail Oil

    Here’s what sets it apart:

    • Deep Hydration: Nourishes cuticles and nails with Vitamin E, safflower oil, and botanical extracts.
    • Strengthens Nails: Regular use can reduce breakage and promote faster, healthier nail growth.
    • Soothes & Heals: Honey’s natural anti-inflammatory properties help soothe irritated skin.
    • Smells Amazing: Warm, subtle scent that makes your nails smell like they belong in a high-end spa.
    • Non-Greasy Formula: Absorbs quickly so you don’t leave smudges everywhere.

    🛠️ How to Use It

    It’s as simple as drop, massage, repeat. Here’s how to add it to your nail routine like a total pro:

    Cuccio Cuticle Nail Oil
    Cuccio Cuticle Nail Oil
    1. Start with clean hands (bare nails or post-polish — doesn’t matter).
    2. Apply one drop per nail using the dropper directly on your cuticle.
    3. Massage it in with circular motions for 15 seconds to boost absorption and stimulate growth.
    4. Repeat daily, or at least a few times a week, especially after washing your hands or using acetone.

    💡 Pro tip: Use it before bed so it can soak in overnight while you sleep. Wake up to nourished, glowing nails!

    💬 What Customers Are Saying

    People are obsessed with this stuff — like “I won’t use anything else” level obsessed. Customers rave about how quickly it transforms dry, cracked cuticles and how soft and healthy their nails look with consistent use.

    Cuccio Cuticle Nail Oil
    Cuccio Cuticle Nail Oil

    Many say it helped their nails grow longer and stronger after acrylic or gel damage, and even salon pros in nail salons swear by it. The dropper bottle is also a hit for mess-free, travel-friendly application.

    Bottom line: it’s luxury cuticle care without the luxury price tag.

    ✅ Is It Safe?

    Yes, 100%! Cuccio’s cuticle oil is made with sensitive skin and nail health in mind, so it’s safe for everyday application. Here’s why it earns an A+ for safety:

    Cuccio Cuticle Nail Oil
    Cuccio Cuticle Nail Oil
    • No Harsh Chemicals: Free from parabens, formaldehyde, and other harsh additives that can dry out or damage your skin and nails.
    • Natural Ingredients: Packed with botanical oils, vitamin E, and honey extract to nourish without irritation.
    • Cruelty-Free: Not tested on animals, so you can feel good about your purchase.
    • Dermatologist-Trusted: Used by professionals in salons across the country, making it a trusted staple in the beauty world.
    • Gentle Enough for Daily Use: Absorbs easily without leaving behind residue, making it ideal for anyone with sensitive cuticles or skin.

    If you have extra-sensitive skin, it’s always smart to do a patch test — but overall, this is one of the gentlest formulas out there.

    🆚 Competitor Products: Why Cuccio Wins

    There are plenty of cuticle oils on the market, but here’s why Cuccio comes out on top, time and time again:

    Cuccio Cuticle Nail Oil
    Cuccio Cuticle Nail Oil
    • Long-Lasting Hydration: Some oils hydrate temporarily — Cuccio actually helps restore the cuticle barrier and keep it healthy over time.
    • Lightweight, Fast-Absorbing Formula: No greasiness, no sticky mess. Just silky smooth nourishment.
    • Bigger Bottle, Better Value: You get 2.5 oz of product (seriously generous) — way more than most rollerball or brush-on cuticle oils.
    • Luxury Scent: Unlike overpowering fruity or chemical-smelling oils, this one has a subtle, soothing scent that feels spa-worthy.
    • Trusted by Nail Techs: This is a go-to in salons for a reason — it works, and it works well.

    💸 Cost vs. Salon Care

    Let’s talk budget. A single cuticle treatment at the salon can cost around $15–$25 — and you’ll need it every 2–3 weeks. That adds up fast.

    Cuccio’s bottle lasts for months with regular use and costs less than one salon visit. You’re not just saving money — you’re also protecting your time and giving your nails consistent care in between professional services.

    Plus, compared to other at-home oils that run out quickly or barely make a difference, Cuccio delivers way more bang for your buck. This is one of the smartest, most affordable ways to keep your nails looking salon-fresh year-round.

    💬 End Conclusion: A Must-Buy – Point Blank, Period

    If you’ve been sleeping on cuticle oil, now’s the time to level up. The Cuccio Revitalize Cuticle Oil in Natural Scents isn’t just a nice-to-have — it’s a must-have for strong, healthy nails and glowing, hydrated hands.

    Whether you’re into DIY manis or just want your hands to look a little more put-together, this cuticle oil brings the hydration, healing, and heavenly scent — all without the salon markup.

    ✨ Glowy nails. Healthy cuticles. A dreamy scent. Zero greasy residue. Maximum results. Ready to upgrade your nail game for under $10? Add it to cart and thank yourself later. 💅

  • Secret Reveal! This Insane Cuticle Remover Works in Under 15 Seconds and is Dermatologist Safe: Top Ranked Review

    Secret Reveal! This Insane Cuticle Remover Works in Under 15 Seconds and is Dermatologist Safe: Top Ranked Review

    🔥 Trending now – share this post

    Let’s be real — no matter how cute your polish is, if your cuticles are dry, ragged, or overgrown, it throws off the whole look. But who has time for salon-level cuticle care every week? Enter your new favorite secret weapon: the Sally Hansen Instant Cuticle Remover. This little squeeze tube is here to save your nails and your time.

    💡 What Is It?

    This cult-favorite product is a fast-acting gel formula that dissolves excess cuticles in just 15 seconds. Yup, that’s it. You squeeze it on, let it sit, push your cuticles back, and boom — clean, fresh nail beds. No need for soaking, scrubbing, or stressful snipping.

    Sally Hansen Cuticle Remover
    Sally Hansen Cuticle Remover

    The formula includes aloe and chamomile, so it’s gentle on skin while still powerful enough to get the job done. Whether you’re prepping for a mani or just want your hands to look cleaner and more polished, this cuticle remover is your new go-to.

    ✨ Why It’s a Game-Changer

    If you’ve been using a cuticle pusher with no softener — or worse, cutting your cuticles dry (ouch) — this is your sign to switch it up. Sally Hansen’s formula makes cleanup quick, painless, and shockingly effective.

    Here’s what makes it amazing:

    • Instant Results: Works in just 15 seconds. Seriously. Set a timer.
    • No Soaking Required: Skip the warm water soak — this does the work for you.
    • Gentle Yet Effective: Softens and dissolves dead skin without harsh scrubbing or cutting.
    • Mess-Free Squeeze Tube: Easy to apply right where you need it with zero product waste.
    • Budget-Friendly: One bottle lasts forever and costs under $10 — versus paying $10+ per salon visit just for cuticle care.

    🛠️ How to Use It

    This product is insanely easy to use — here’s how to work it into your routine like a pro:

    Sally Hansen Cuticle Remover
    Sally Hansen Cuticle Remover
    1. Start with Dry Hands: Don’t soak — this formula works best on dry skin.
    2. Apply the Gel: Squeeze a small amount onto each cuticle and the surrounding nail bed.
    3. Let It Sit: Wait just 15 seconds (you can wait up to 1 minute if your cuticles are really overgrown).
    4. Push Gently: Use a cuticle pusher to gently push back softened skin.
    5. Wash It Off: Rinse thoroughly with soap and warm water to remove any residue.

    🗓 How often to use:

    1–2 times per week for maintenance, or anytime your cuticles are looking rough. Just don’t overuse — you don’t want to over-thin the skin around your nails.


    💬 What Customers Are Saying

    This product has a serious fan base. Customers love how fast it works, how gentle it feels, and how easy it is to use, even for beginners. Many reviewers say it completely changed their nail prep game and saved them from rough-looking cuticles between salon visits.

    Sally Hansen Cuticle Remover
    Sally Hansen Cuticle Remover

    It’s especially popular among people who do gel, acrylic, or dip nails and need a clean canvas before every set. Even nail techs are calling it their holy grail for quick cuticle work.

    ✅ Is It Safe?

    Yes — when used as directed, Sally Hansen Instant Cuticle Remover is totally safe. It’s dermatologist-tested and contains soothing ingredients like aloe and chamomile to prevent irritation. But like all treatments, there are a few safety rules to follow:

    • Don’t leave it on too long: Stick to the 15–60 second window to avoid overexfoliating.
    • Avoid broken skin: If your cuticles are cracked or irritated, wait until they heal before using.
    • Wash thoroughly: Always rinse off completely after use.

    Used properly, it’s one of the safest and easiest ways to maintain healthy, clean cuticles.

    🆚 Competitor Products: Why This One Wins

    There are a few other cuticle removers out there, but Sally Hansen stands out for a reason:

    Sally Hansen Cuticle Remover
    Sally Hansen Cuticle Remover
    • Faster than others: Many products require 5–10 minutes — this one works in seconds.
    • Less mess: The gel stays where you put it, unlike liquid formulas that run everywhere.
    • Affordable & long-lasting: One tiny tube gives you dozens of uses.
    • Widely trusted: It’s been a cult-favorite for years and has a loyal fan base of both pros and everyday users.

    Compared to higher-priced options or gimmicky DIY kits, this one just works — and works fast.

    💬 Final Conclusion: Add To Cart and Buy Now

    If you’ve been skipping cuticle care because it feels time-consuming or intimidating, the Sally Hansen Instant Cuticle Remover is about to be your new obsession. It’s fast, effective, affordable, and makes your nails look 10x cleaner and more polished — even if you don’t paint them.

    ✨ Clean cuticles in under a minute. No soaking. No tools. No stress. Grab a tube and give your nails the glow-up they deserve — smooth, prepped cuticles make everything look more put-together.

  • Total Slay! I Just Bought This 20-Pack Professional Salon Nail Filers and Buffers for Less Than a Coffee: Top Ranked Review

    Total Slay! I Just Bought This 20-Pack Professional Salon Nail Filers and Buffers for Less Than a Coffee: Top Ranked Review

    🔥 Trending now – share this post

    Whether you’re a nail newbie or full-blown at-home manicure artist, one thing’s for sure — having high-quality nail files and buffers in your kit is essential. And we’re not talking about those flimsy, one-and-done emery boards from the drugstore. Enter: the HeeYaa Professional 20-Pack Double-Sided Nail Files & Buffers Set.

    These heavy-duty yet gentle nail tools give you salon-level shaping, smoothing, and finishing — right at home, for a fraction of the cost.

    💡 What Is It?

    This set includes 20 premium double-sided nail files, each with a 100/180 grit. What does that mean for you? You’re getting two different textures on each file:

    HeeYaa Nail File and Buffer
    HeeYaa Nail File and Buffer
    • 100 grit is great for shaping acrylics, extensions, and thicker nail enhancements
    • 180 grit is perfect for natural nails, prepping for polish, and smoothing out edges

    Basically, you’ve got everything you need for both natural and artificial nail care — in one slim, easy-to-use file. And because you get 20 of them in a single pack, you’ll be stocked for months (or forever, honestly).

    ✨ Why It’s a Game-Changer

    This isn’t just about shaping your nails. It’s about upgrading your entire nail routine. These files make every step — from filing to buffing to prepping — faster, smoother, and way more effective.

    HeeYaa Nail File and Buffer
    HeeYaa Nail File and Buffer

    Here’s why they’re a total win:

    • Professional Grit Levels: Just like what nail techs use. Seriously — this is the real deal.
    • Durable & Reusable: These aren’t one-time use. You can clean and reuse them multiple times without them falling apart.
    • Gentle on Natural Nails: While strong enough for acrylics, they’re still gentle enough to use on natural nails without shredding them.
    • Perfect for Home or Travel: Slim, lightweight, and super portable — throw one in every bag if you want.
    • Cost Savings? Huge. One salon visit = $40–$60. One pack of these? A fraction of the price for 20 of these files versus expensive repeat salon visits.

    🛠️ How to Use Them

    These nail files are beginner-friendly and super intuitive. But here’s a quick guide so you can maximize your mani:

    HeeYaa Nail File and Buffer
    HeeYaa Nail File and Buffer
    1. Choose your grit: Use the 100 grit side for shaping thick nails (acrylics, gels, or press-ons), and the 180 grit for refining edges and prepping natural nails.
    2. File in one direction: Avoid sawing back and forth — that can weaken the nail. Instead, file gently in one direction.
    3. Smooth & buff: Use the finer side to even out the nail surface or gently prep for polish.
    4. Clean between uses: Wipe with alcohol or gently rinse and air dry to reuse.

    🗓 How often to use: Use the file every 1–2 weeks for shaping and maintenance. Buffing should only be done every few weeks to avoid over-thinning natural nails.

    💬 What Customers Are Saying

    Buyers are raving about the quality and quantity in this set. Most say the files feel super sturdy — not flimsy or bendy like cheap drugstore versions.

    HeeYaa Nail File and Buffer
    HeeYaa Nail File and Buffer

    Reviewers love that each file lasts through multiple uses, even on acrylics and press-ons. People also appreciate that they’re comfortable to hold and don’t shred the nails. A lot of at-home nail artists and even salon pros keep these on hand because of the pro-grade grit and affordability.

    ✅ Is It Safe?

    Totally. These files are safe for natural nails when used with care and are made from high-quality materials that won’t splinter, snap, or damage your nail beds.

    HeeYaa Nail File and Buffer
    HeeYaa Nail File and Buffer

    Safety Tips:

    • Don’t file aggressively — let the grit do the work.
    • Clean between uses to keep things hygienic.
    • Replace when the grit wears down (you’ve got 20, so no stress).

    When used properly, these are a clean, safe, and effective way to keep your nails in top shape.

    🆚 Competitor Products: Why This One Wins

    Let’s be real — a lot of budget nail files out there just don’t hold up. Here’s why this set stands out:

    • Quality: Many cheap packs have inconsistent grit or start peeling after one use. These stay strong and perform consistently.
    • Quantity: 20 files in one pack means you’re stocked — and not constantly running out.
    • Price Point: Less than $10? You’d be hard-pressed to find this many salon-grade files for that price.
    • Dual Function: You don’t need to buy separate buffers and files. These are 2-in-1.

    💬 Final Thoughts

    If you’re building your at-home nail kit — or just tired of paying salon prices for basic shaping — the HeeYaa Professional 20-Pack Double-Sided Nail Files & Buffers Set is a no-brainer. They’re affordable, effective, beginner-friendly, and straight-up reliable.

    ✨ Get salon-style nails for pocket change — no appointments, no frills, just flawless nails every time. Add these to your cart, toss one in every makeup bag, and never settle for weak, wimpy files again.

  • I’m Shook! This Game-Changing Electric Nail Drill Saves Me So Much Time Filing, Buffing, Shaping, and More: Top Ranked Review

    I’m Shook! This Game-Changing Electric Nail Drill Saves Me So Much Time Filing, Buffing, Shaping, and More: Top Ranked Review

    🔥 Trending now – share this post

    Salon nails at home? Yeah, it’s a thing — and it’s way easier (and cheaper) than you think. Whether you’re a DIY acrylic queen, obsessed with gel polish, or just want to smooth and shape like a pro, one tool can totally level up your routine: the MelodySusie Portable Electric Filing, Shaping, and Buffing Nail Drill.

    💡 What Is It?

    This is more than your average nail file. The MelodySusie Electric Nail Drill is a sleek, powerful, and portable tool that makes filing, shaping, buffing, and removing polish a breeze. It’s lightweight, USB-powered (hello, convenience), and perfect for both beginners and advanced users who want that flawless finish — minus the salon price tag.

    MelodySusie Electric Nail Drill
    MelodySusie Electric Nail Drill

    It comes with 6 drill bits and 6 sanding bands that you can swap out easily, so whether you’re removing gel polish, smoothing ridges, or prepping your nail beds, you’ve got the right tool for the job.

    ✨ Why It’s a Game-Changer

    This tool seriously brings the salon to your desk or bathroom counter. It’s a full-blown upgrade from manual filing and gets your nails looking clean, smooth, and professionally finished — in way less time.

    MelodySusie Electric Nail Drill
    MelodySusie Electric Nail Drill
    • Salon-Level Results: Get clean cuticles, smooth surfaces, and even remove acrylics and gels without damaging your natural nails.
    • Custom Speed Control: The adjustable speed (up to 20,000 RPM!) means you can go gentle or strong depending on what your nails need.
    • Super Fast: Stop doing your nail care by hand that takes forever and switch to what the pros use.
    • Quiet and Vibration-Free: Unlike bulkier electric files, this one is whisper-quiet and super smooth. No buzzing, no shaking.
    • Portable & Lightweight: It fits in your hand like a pen and plugs in via USB — so you can literally use it anywhere.
    • Major Cost Savings: Nail salons charge $10–$20 just to remove gel or acrylics. Add in shaping, prep, and polish? You’re looking at $60+ per visit. This one-time tool costs less than a single salon session and pays for itself as fast too.

    🛠️ How to Use It

    The MelodySusie drill is beginner-friendly and easy to learn to use. Here’s a quick step-by-step to help you slay your nail care routine:

    MelodySusie Electric Nail Drill
    MelodySusie Electric Nail Drill
    1. Choose Your Bit: Select the right drill bit for the job — use finer bits for buffing and prep, and coarser ones for polish or acrylic removal.
    2. Plug In & Power Up: Use the USB cord to connect to any power source (laptop, adapter, power bank — super handy).
    3. Set Your Speed: Start on a lower RPM (especially if you’re new!) and adjust as needed.
    4. Buff or File: Gently move the drill over your nails in one direction. Don’t press too hard — let the tool do the work.
    5. Finish & Moisturize: Once you’re done, clean off the dust, apply cuticle oil, and enjoy your smooth, fresh nails.

    ⏳ How Often Can You Use It? Use it every 1–2 weeks for regular maintenance or as often as needed for polish removal and nail prep. Just don’t overdo it — your natural nails need a break too!

    💬 What Customers Are Saying

    Customers are loving how powerful and easy to use this nail drill is — especially considering the low price point. It’s a favorite among beginners who are learning how to do gel or dip nails at home, and even seasoned nail techs say it holds up surprisingly well for personal use.

    MelodySusie Electric Nail Drill
    MelodySusie Electric Nail Drill

    The compact size, portability, and quiet motor are huge wins for everyone, and reviewers also appreciate that it doesn’t heat up quickly like some bulkier models. Overall, it’s seen as a total steal for salon-quality nail care on a budget.

    ✅ Is It Safe?

    Yes — 100% safe when used correctly. The drill is designed for personal use and offers speed control so you won’t overdo it. The bits are gentle on natural nails, and the pen-like grip makes it easy to maneuver without slipping.

    Safety Tips:

    • Start slow and practice on lower speeds until you’re confident.
    • Always sanitize your bits after each use.
    • Don’t use the drill on broken or inflamed skin.
    • Avoid using on the same spot for too long to prevent heat buildup.

    With a little practice and proper care, this tool is a totally safe way to elevate your nail routine.

    🆚 How It Stacks Up: Competitor Comparison

    • Versus Manual Filing: Way faster, more precise, and zero hand strain.
    • Versus Expensive Salon Visits: Spend $60+ every few weeks at the salon or invest once and DIY for under $20 forever.
    • Versus Other Drills: Many cheaper drills have weak motors, overheat, or are super noisy. This one stays cool, runs quietly, and handles like a dream.
    • Versus High-End Drills ($50–$100): Unless you’re doing nails for clients, you probably don’t need the heavy-duty stuff. This does everything a home user needs — at a fraction of the cost.

    This drill hits the sweet spot between quality and affordability, making it a smart buy whether you’re new to nails or a seasoned at-home artist.

    💬 Final Thoughts

    The MelodySusie Portable Electric Filing, Shaping, and Buffing Nail Drill is seriously one of the best upgrades you can make to your at-home nail game. It’s sleek, effective, and gives you that smooth, pro finish — without the salon stress or cost.

    Whether you’re tired of scrubbing off gel polish by hand or just want more control over your nail prep, this tool has your back. It’s powerful, portable, beginner-friendly, and budget-approved.

  • Peep This! I Save Hundreds Per Year Now Avoiding Expensive Salon Trips with this Ultimate Mani Pedi Kit: Top Ranked Review

    Peep This! I Save Hundreds Per Year Now Avoiding Expensive Salon Trips with this Ultimate Mani Pedi Kit: Top Ranked Review

    🔥 Trending now – share this post

    If you’ve ever wrestled with a rusty or dull old nail clipper or tried trimming your cuticles with some sketchy tweezers, you already know the struggle.

    Elevating your nail care routine doesn’t have to mean weekly salon visits or expensive one-time-use kits — all you need is a well-made, long-lasting toolkit that does it all. Meet the Yougai 18-Piece Manicure & Pedicure Kit — your new go-to for salon-quality nails right at home.

    💼 What Is It?

    This is not your average nail clipper set. This Manicure and Pedicure Set is a premium 18-piece grooming collection housed in a sleek, travel-ready zip-up case. You get everything you need for a full mani-pedi: clippers, cuticle trimmers, tweezers, nail files, and more — all crafted from high-quality stainless steel.

    Yougai Manicure Pedicure Kit
    Yougai Manicure Pedicure Kit

    Designed with precision and care, this set brings professional grooming quality straight to your bathroom counter.

    ✨ Why It’s a Total Game-Changer

    This kit checks every box: performance, value, durability, and aesthetic. If you’re serious about self-care or just want to stop overpaying for basic nail maintenance, this set is the move.

    Yougai Manicure Pedicure Kit
    Yougai Manicure Pedicure Kit
    • Pro-Level Tools: No flimsy, bendy pieces here. Each tool is made from solid stainless steel with a sharp, precise edge that gets the job done effortlessly.
    • Complete Kit: It covers all the essentials — and then some. Whether you’re trimming, shaping, or smoothing, you’ve got exactly what you need.
    • Reusable & Long-Lasting: No more throwing out cheap nail files or replacing broken clippers. This kit is built to last for years.
    • Stylish & Compact: The case is sleek and functional, perfect for travel, gym bags, or just keeping things organized at home.
    • Unmatched Cost-Effectiveness: Salon quality at home for a one time insanely low price. Dead giveaway choice here to get this now.

    Let’s break this down — a basic salon mani-pedi averages $60–$80, depending on where you live. One visit a month? You’re spending $720–$960 a year — and that’s not even for fancy extras.

    This kit costs under $10 and gives you endless at-home treatments with no recurring cost. That’s major savings. Plus, most drugstore kits don’t even compare in terms of quality and longevity — and they still cost $10–$20 for a basic, short-term setup.

    🛠️ How to Use It

    This kit is perfect for all skill levels — from beginners to grooming pros. Here’s a simple routine to get the most out of every piece:

    Yougai Manicure Pedicure Kit
    Yougai Manicure Pedicure Kit
    1. Soften First: Soak your hands or feet in warm water for 5–10 minutes to soften skin and nails.
    2. Clip & Trim: Use the nail clippers and scissors to shape nails to your desired length.
    3. File the Edges: Smooth things out with the included file to prevent snags or sharp edges.
    4. Tame Those Cuticles: Use the cuticle pusher to gently push back cuticles, then trim any excess with the cuticle nipper or scissors.
    5. Detail Work: The tweezers and precision tools are great for cleaning under nails or addressing small areas.
    6. Hydrate: Follow up with cuticle oil or your favorite moisturizer to keep nails and skin nourished.

    🔁 How Often Should You Use It? A full mani-pedi session every 1–2 weeks is perfect for maintenance. Touch up as needed — especially for hangnails or shaping.

    💬 What Customers Are Saying

    Customers are seriously impressed with how durable and high-quality this kit feels. Many mention that it feels just like (or better than!) the tools used in professional salons. The stainless steel construction gets high praise for staying sharp and rust-free, even after long-term use.

    Yougai Manicure Pedicure Kit
    Yougai Manicure Pedicure Kit

    People also love the aesthetic of the zippered case — it feels like a grown-up upgrade from cheap drugstore sets. Users who travel a lot say this kit has become their go-to grooming essential on the road. Overall, reviewers feel like they got way more than their money’s worth.

    ✅ Is It Safe?

    Yes —these tolls are totally safe and hygienic when used correctly. Since the tools are stainless steel, they’re resistant to rust and super easy to sanitize.

    Safety Tips:

    • Disinfect Tools After Each Use: Wipe with alcohol or wash with warm soapy water, then dry completely before storing.
    • Don’t Share: Keep your kit personal to avoid bacteria transfer.
    • Be Gentle: Especially when trimming cuticles — a light touch prevents irritation or cuts.

    If you follow the basics of good hygiene, this kit is the ultimate way to maintain healthy nails long-term.

    🔍 How It Stacks Up: Competitor Comparison

    So, how does this 18-Piece Manicure and Pedicure Kit compare to other manicure/pedicure sets? Let’s break it down:

    • Versus Drugstore Kits: Most cheaper sets use lightweight metal that dulls quickly or rusts. Plus, they often lack essentials like a cuticle pusher or nail cleaner. This kit includes everything — and it’s built to last.
    • Versus Fancy Luxury Kits ($50–$100+): Sure, there are high-end options out there, but you’ll pay double or triple for very similar tools. This kit gives you professional-grade performance without the luxury markup.
    • Versus Individual Tool Buys: Buying tools one-by-one adds up fast — $10 for clippers, $15 for tweezers, $8 for files, and so on. This set bundles everything for less, in one sleek case.

    You’re basically getting the best of both worlds: high quality and high value.

    🛍️ Final Conclusion: A No Brainer Purchase

    The Yougai 18-Piece Manicure & Pedicure Set is your ultimate self-care essential. Whether you’re a nail grooming newbie or a seasoned polish pro, this kit delivers serious results without the salon price tag. You’ll get years of clean, polished nails, and this kit pays for itself with even one less salon visit.

    Point Blank, Period: It’s pro-level. It’s portable. It’s stylish. And it’s one of the smartest beauty buys out there.

  • Bruh Did You Know!? Here’s How My Manicures Are Under $1 Now Switching to DIY Nail Falsies: Top Ranked Review

    Bruh Did You Know!? Here’s How My Manicures Are Under $1 Now Switching to DIY Nail Falsies: Top Ranked Review

    🔥 Trending now – share this post

    Let’s be real — salon nails are cute, but the price tag? Not so much. If you’re craving that fresh set without draining your wallet, it’s time to meet your new nail BFF: UNA GELLA Multi-Shape Clear False Nail Extensions.

    These bad boys are giving salon-level vibes at a stay-at-home price — and trust, your wallet will thank you. See the crazy savings and why we choose them below.

    💖 What Are They?

    UNA GELLA’s pre-shaped nail tips are full-cover clear extensions that come in all the trendy shapes — almond, coffin, stiletto, and more. They’re designed to give you that clean, pro-level look from the comfort of your own vanity.

    UNA GELLA False Nail TIps
    UNA GELLA False Nail TIps

    They’re super versatile too! You can paint on any nail polish or use gels or dip powder too! Whether you’re a total beginner or a DIY diva, these tips make it ridiculously easy to slay your set without stepping foot in a salon.

    ✨ Why They’re a Game-Changer

    These nail tips aren’t just cute — they’re actually built to perform. You don’t have to compromise on quality just because you’re not hitting up the salon. In fact, you’ll absolutely kick yourself for why you didn’t start doing your own nails sooner.

    UNA GELLA False Nail TIps
    UNA GELLA False Nail TIps
    • Pre-Shaped Perfection: No need to spend hours filing — these tips come ready to go in your favorite shapes.
    • Durable AF: Customers rave about their strength and longevity. With proper application, they can last up to 2–3 weeks without lifting or breaking.
    • Easy Application: Pair them with your favorite nail glue or builder gel, and you’re set. They’re beginner-friendly and perfect for quick at-home manis.
    • Super Cost-Effective: A single trip to the salon can cost $50–$80 or more for a full set — and that’s not including fills or repairs.

    Let me be clear- with this insane UNA GELLA false nail tip kit, you’re getting 500 pieces in one pack for under $20. That’s enough for 25+ full sets, which breaks down to less than $1 per manicure. You can literally treat yourself weekly and still spend less than one salon visit.

    🛠️ How to Use Them

    Application is super beginner-friendly, and once you’ve done it a couple times, you’ll be speeding through like a total pro. Here’s the lowdown:

    UNA GELLA False Nail TIps
    UNA GELLA False Nail TIps
    1. Prep Your Nails: Gently push back cuticles, file the surface of your natural nails to remove shine, and wipe clean with alcohol or nail cleanser.
    2. Choose Your Size: Select the tip that fits your nail bed from the 500-piece set. You want it to cover sidewall to sidewall without hanging over.
    3. Apply Product: Use a thin layer of nail glue or builder gel on both your natural nail and the underside of the tip. If you’re using gel, you’ll need a UV/LED lamp to cure.
    4. Press & Hold: Align the tip with your cuticle line and press down firmly. Hold for about 10–15 seconds if using glue, or cure under the lamp for 60 seconds if using gel.
    5. Refine & Finish: File the edges if needed, then add polish, nail art, or top coat. Boom, done.

    🔁 How often? Most people get 2–3 weeks of wear, depending on your lifestyle. Since you have 500 pieces, you can do new sets often without worrying about running out. In fact we recommend you try as many styles and art designs as you want!

    🗣️ What People Are Saying

    The reviews are glowing. Users are obsessed with the salon-quality look and how durable these tips are. They love the variety of shapes and sizes, which makes it super easy to get that perfect fit without any extra shaping.

    UNA GELLA False Nail TIps
    UNA GELLA False Nail TIps

    People with active lifestyles mention how well the tips hold up during day-to-day tasks. A few users did point out that the lengths run a little long for some nail tip varieties, but that’s a win if you love a dramatic look — and you can always trim them down.

    ✅ Safety First

    Like all acrylic or gel systems, proper application and removal are key to keeping your natural nails healthy. UNA GELLA tips are totally safe to use regularly if you follow a few golden rules:

    • Avoid Overuse: Let your natural nails breathe between sets if they’re feeling weak.
    • Proper Removal: Don’t rip or peel! Soak off with acetone to avoid damage.
    • Allergy Awareness: If you’re new to nail glue or gel, do a patch test on your skin first to check for sensitivity.

    🛍️ Final Thoughts: Easy and Less than $1 Per Manicure? Heck Yes

    UNA GELLA Pre-Shape False Nail Extensions are everything: easy, affordable, durable, and super cute. Whether you’re a beauty newbie or a seasoned nail enthusiast, this kit takes your nail game to the next level without draining your bank account. You’re literally getting 25+ salon-quality sets in one pack — that’s a major steal.

    If you’ve been thinking about getting into DIY nails or just want a backup plan between salon visits, this is your sign. Hurry and grab your set before everyone else finds out and start turning your nails into your favorite accessory. 💅✨

  • Finally! This Nail Glue Holds Better Than My Salon’s and I Stopped Pop Offs Forever: Top Ranked Review

    Finally! This Nail Glue Holds Better Than My Salon’s and I Stopped Pop Offs Forever: Top Ranked Review

    🔥 Trending now – share this post

    Okay, let’s talk about a universal beauty struggle: press-ons or acrylics that pop off mid-week like they’ve got other plans. You’re vibing, looking cute, and suddenly… there goes your pinky nail flying across the room, so aggravating . 😩

    If this sounds familiar, you need to meet your new glue BFF: the NYK1 Nail Bond Super Strong Nail Glue. It’s giving salon strength, but for your vanity drawer.

    What Is It?

    This isn’t your average dollar store nail glue that barely survives one brunch. NYK1’s Nail Bond is salon-grade, ultra-strong, and made to keep your nails locked in like a stage-five clinger (but in a good way). Whether you’re doing acrylics, tips, or press-ons, this glue holds it down for real.

    NYK1 Nail Bonding Glue
    NYK1 Nail Bonding Glue

    And unlike some runny messes out there, this glue goes on smooth and controlled — no crusty glue bubbles or messy fingers.

    Why It’s a Game-Changer

    With a salon quality hold and unbeatable security, your nails will thank you and you’ll thank them.

    NYK1 Nail Bonding Glue
    NYK1 Nail Bonding Glue
    • Super Strong Hold: Like, scary-strong. People are reporting full wear for 2+ weeks — no lifting, no embarrassing nail mishaps in public.
    • Salon-Quality Formula: This isn’t some random sticky formula. It’s designed to match what actual nail techs use.
    • Tiny But Mighty: A little goes a long way. The 7g bottle might look small, but it’ll last you a ton of sets.
    • Quick-Dry Magic: Dries in seconds. No need to awkwardly wave your hands around or babysit your nails while they set.

    DIY vs. Salon: Let’s Do the Math

    Look, salon nails are a luxury — and sometimes we’re here for it. But between the $60+ price tags, tips, and maintenance… it adds up fast. If you’re doing nails regularly, that’s like a vacation’s worth of money every few months.

    NYK1 Nail Bonding Glue
    NYK1 Nail Bonding Glue

    Enter: NYK1 glue + your fave press-ons or acrylics = flawless nails on your time, on your budget.

    You get the same long-lasting, secure wear without draining your bank account. And if you love switching up styles often? Even better — pop ‘em on, pop ‘em off (with care), and repeat.

    How to Use It (Spoiler: Easy AF)

    So easy to apply in about 10 seconds it doesn’t make sense to not do this yourself.

    1. Start Fresh: Make sure your natural nails are clean, dry, and lightly buffed.
    2. Apply a Tiny Bit: You don’t need a ton — just a small dot on either your nail or the fake nail.
    3. Press + Hold: Hold for about 5-10 seconds. That’s it. She’s not going anywhere now.
    4. Clean Up: If any glue seeps out, just wipe it with a lint-free cloth or orange stick. Done and dusted.

    Pro Tip: Keep a bottle in your bag in case of emergency — though tbh, with this glue, you probs won’t need it.

    What the People Are Saying 📣

    Reviews are glowing. Customers consistently say NYK1 Nail Bond is one of the strongest and most reliable glues they’ve ever used. It keeps press-ons and acrylics locked in for up to two weeks or more — even with daily chores, washing dishes, or chasing toddlers.

    NYK1 Nail Bonding Glue
    NYK1 Nail Bonding Glue

    People love how easy it is to use and how little product you actually need. Many loyal users have been repurchasing it for years and swear by its salon-quality performance. Long story short: it delivers on the hold, doesn’t lift or chip, and gives you serious staying power without the salon appointment.

    Is It Safe? Let’s Talk 👀

    Yes — NYK1 Nail Bond is safe to use when applied correctly, just like any professional-grade nail adhesive. It’s formulated for use on nails only and is free from harmful gimmicks or weird ingredients. That said, like with all nail glues, you want to follow a few smart safety tips:

    • Avoid skin contact: Apply only to the nail, not your cuticle or surrounding skin.
    • Ventilation is your friend: Use in a well-ventilated area to avoid inhaling fumes.
    • Store it right: Keep the cap sealed tight when not in use to prevent spills or clumping.
    • Remove gently: Don’t rip or force nails off — soak in acetone to dissolve the glue and protect your natural nails.

    If you have super sensitive skin or allergies, patch test first or consult your dermatologist. But for most users, it’s totally safe and salon-approved.

    Why NYK1 Wins Over Other Glues

    Here’s the tea: most nail glues either don’t last, get weird and crusty, or have that funky smell that makes you question your life choices. NYK1? None of that.

    • It holds like cement (but cute).
    • Doesn’t get gummy or thick over time.
    • The packaging is clean, sleek, and doesn’t leak all over your beauty bag.
    • It works for everything: acrylic tips, press-ons, rhinestones, you name it.

    Final Conclusion — This Stuff Slays

    If you’re over flaky nail glue and random pop-offs ruining your vibe, do yourself a favor and grab the NYK1 Nail Bond. It’s tiny but mighty, dries fast, and keeps your nails locked in so you can stop worrying and start slaying.

    Your nails (and your wallet) are gonna love this.

  • Dip Powder Nails 101: A Complete Beginner’s Learning Tutorial

    Dip Powder Nails 101: A Complete Beginner’s Learning Tutorial

    🔥 Trending now – share this post

    Hey nail newbies and beauty buffs! If you’re craving strong, long-lasting nails with a sleek finish—and you’re not into the whole UV light or glue routine—dip powder nails might be your perfect match.

    These trendy, colorful, and durable nails are somewhere between gel and acrylic, giving you the best of both worlds without too much fuss. Whether you’re learning to DIY your dip manicure or just want to understand the hype, this guide has everything you need.

    What Are Dip Powder Nails?

    Dip powder nails are a nail enhancement technique that involves layering colored acrylic powder over a base coat. Instead of painting on polish, your nails are dipped (or brushed) into powder between layers of bonding resin. Once sealed with a top coat, the result is a hard, smooth, long-lasting nail with a vibrant color payoff. No UV light needed!

    Dip nails are known for their strength, longevity, and quick drying time. You’ll often hear them praised for lasting up to 3-4 weeks without chipping.

    A Quick History of Dip Nails

    Dip nails have been around for a while, but they didn’t gain major popularity until the 2010s when nail salons began offering them as a durable, healthier alternative to acrylics. Originally marketed for their strength and odor-free application, dip systems are now a go-to option for clients who want stylish nails that last through travel, work, or everyday chaos.

    What Are Dip Nails Made Of?

    Dip nails use a simple system of products:

    • Base coat (bonding resin): A glue-like liquid that helps powder stick.
    • Colored acrylic powder: Finely milled powder in various shades.
    • Activator: A liquid that hardens the resin and sets the powder.
    • Top coat: A clear layer that adds shine and protection.

    Optional tools include a nail buffer, cuticle pusher, and brush for powder application if you’re not dipping.

    How to Apply Dip Powder Nails (Step-by-Step)

    Doing your own dip nails might seem intimidating at first, but with practice, it becomes second nature. Here’s a beginner-friendly breakdown:

    Step 1: Prep Your Nails

    • Wash and dry your hands.
    • Push back cuticles gently.
    • Lightly buff the nail surface to remove shine.
    • Wipe nails clean with alcohol or nail cleanser.

    Step 2: Apply Base Coat

    • Apply a thin layer of base coat to one nail at a time.
    • Be precise—avoid getting it on cuticles.

    Step 3: Dip into Powder

    • Immediately dip your nail into the colored powder at a 45-degree angle.
    • Tap off the excess gently.
    • Repeat for each nail.

    Step 4: Reapply and Repeat

    • Apply a second coat of base.
    • Dip into the powder again for more opacity.
    • Tap off excess and let sit for a few seconds.

    Step 5: Add Activator

    • Once you’ve dipped all your nails twice, apply activator.
    • Let it dry thoroughly (about 2 minutes).

    Step 6: Shape and Buff

    • File and shape your nails to your preferred style.
    • Gently buff the top for smoothness.

    Step 7: Final Coat

    • Apply another layer of activator.
    • Wait 30 seconds, then add top coat.
    • Let it dry—and voilà! Salon-quality dip nails.

    How to Maintain Dip Powder Nails

    Dip nails are low-maintenance, but here’s how to stretch your mani even longer:

    • Avoid picking or peeling the powder.
    • Wear gloves while doing chores.
    • Apply cuticle oil daily.
    • File down edges if they chip slightly.
    • Add a fresh layer of top coat after a week for shine.

    Dip nails typically last about a month if properly cared for, and you’ll notice growth at the cuticle around week two.

    How to Remove Dip Nails Safely

    Removal is where most people get nervous, but it’s easy when done right.

    Step 1: File the Top Layer

    • Gently file or buff the shiny top coat to break the seal.

    Step 2: Soak in Acetone

    • Soak a cotton ball in pure acetone.
    • Place it on the nail and wrap with foil.
    • Let it soak for 15–20 minutes.

    Step 3: Remove Gently

    • Use a cuticle stick to push off softened dip powder.
    • Don’t scrape—if it’s stubborn, rewrap and soak longer.

    Step 4: Moisturize

    • Wash hands and apply cuticle oil and hand cream.
    • Give your nails a break between applications when possible.

    Are Dip Nails Safe?

    Dip nails are generally safe, especially if applied and removed properly. Since there’s no need for UV light, they’re a solid alternative for anyone avoiding gel.

    Tips to stay safe:

    • Use clean tools to avoid contamination.
    • Avoid dipping multiple clients in the same jar at salons.
    • Give your nails a breather between applications.

    Dip Nails vs. Other Nail Types

    Here’s how dip powder nails compare to the other big nail trends:

    • Acrylics: Thicker and longer-lasting, but require more filing and maintenance.
    • Gel Nails: Glossy and flexible but need UV curing.
    • Wraps & Silk: Great for nail repair but less long-lasting.
    • Press-Ons: Easy and affordable but not as durable.

    Dip nails strike a balance between durability and ease of application. They’re great for people who want long-lasting results without the fuss.

    Why Choose Dip Nails?

    Dip nails are a win for so many reasons:

    • Long-lasting (up to 4 weeks!).
    • No need for UV light.
    • Huge variety of colors.
    • Great for nail strength.
    • Smudge-free application.

    If you want salon-quality nails that don’t chip in a day or require a lightbox, dip is the way to go.

    Final Thoughts

    Dip powder nails combine the best of acrylic strength and gel shine in one user-friendly package. They’re fun to apply, come in every color imaginable, and last through life’s chaos without breaking a sweat.

    Whether you’re a DIY nail enthusiast or just want a low-maintenance mani that looks good for weeks, dip nails are your new bestie. Give them a try, and you might just find your forever nail routine.